
A useful DIY litter mat catches loose grains where your cat already steps, stays flat, and is easy to empty. Start with a shallow cardboard catch tray, interlocking drainage tiles over a catch surface, or an existing mat inside a smooth, low-entry tray. Keep the toilet’s entrance and escape route comfortable before trying to contain more litter.
The household examples below come from publicly shared experiences, not a statistical study; litter, paws, chewing, and home layouts differ.
Choose a structure you can empty easily
Look at the floor after a normal bathroom visit. Are grains dropping beside the doorway, being kicked over the side, or traveling farther with the cat? A catcher belongs in the path of the observed spill. Making the toilet harder to reach in order to capture a few more grains can create a larger problem.
A simple materials list is enough to begin:
| Design | Main materials | Useful tool | How it empties |
|---|---|---|---|
| Shallow catch tray | Clean, rigid cardboard box | Scissors for trimming, used away from the cat | Lift and tip collected dry grains into a waste bag |
| Drainage-tile surface | Smooth interlocking drainage tiles and a washable catch surface | Tape measure | Lift the tiles, then collect grains underneath |
| Mat inside a tray | Existing litter mat and a smooth low-entry tray | Tape measure | Lift the mat and empty the tray separately |
Keep cutting tools, offcuts, and loose fasteners out of the finished area. Before using any household material, inspect its surface, edges, connections, and stability. A material sold for bathrooms or storage still needs to work in the actual place where your cat walks.
1. Make a shallow cardboard catch tray
A box caught what the mat had missed. After trying a litter mat and a raised catcher without the desired result, one owner placed shallow cardboard trays outside two boxes; the photos showed loose grains collecting inside one tray. Try a low-sided catcher along the existing exit path and check whether your cat steps through it normally.
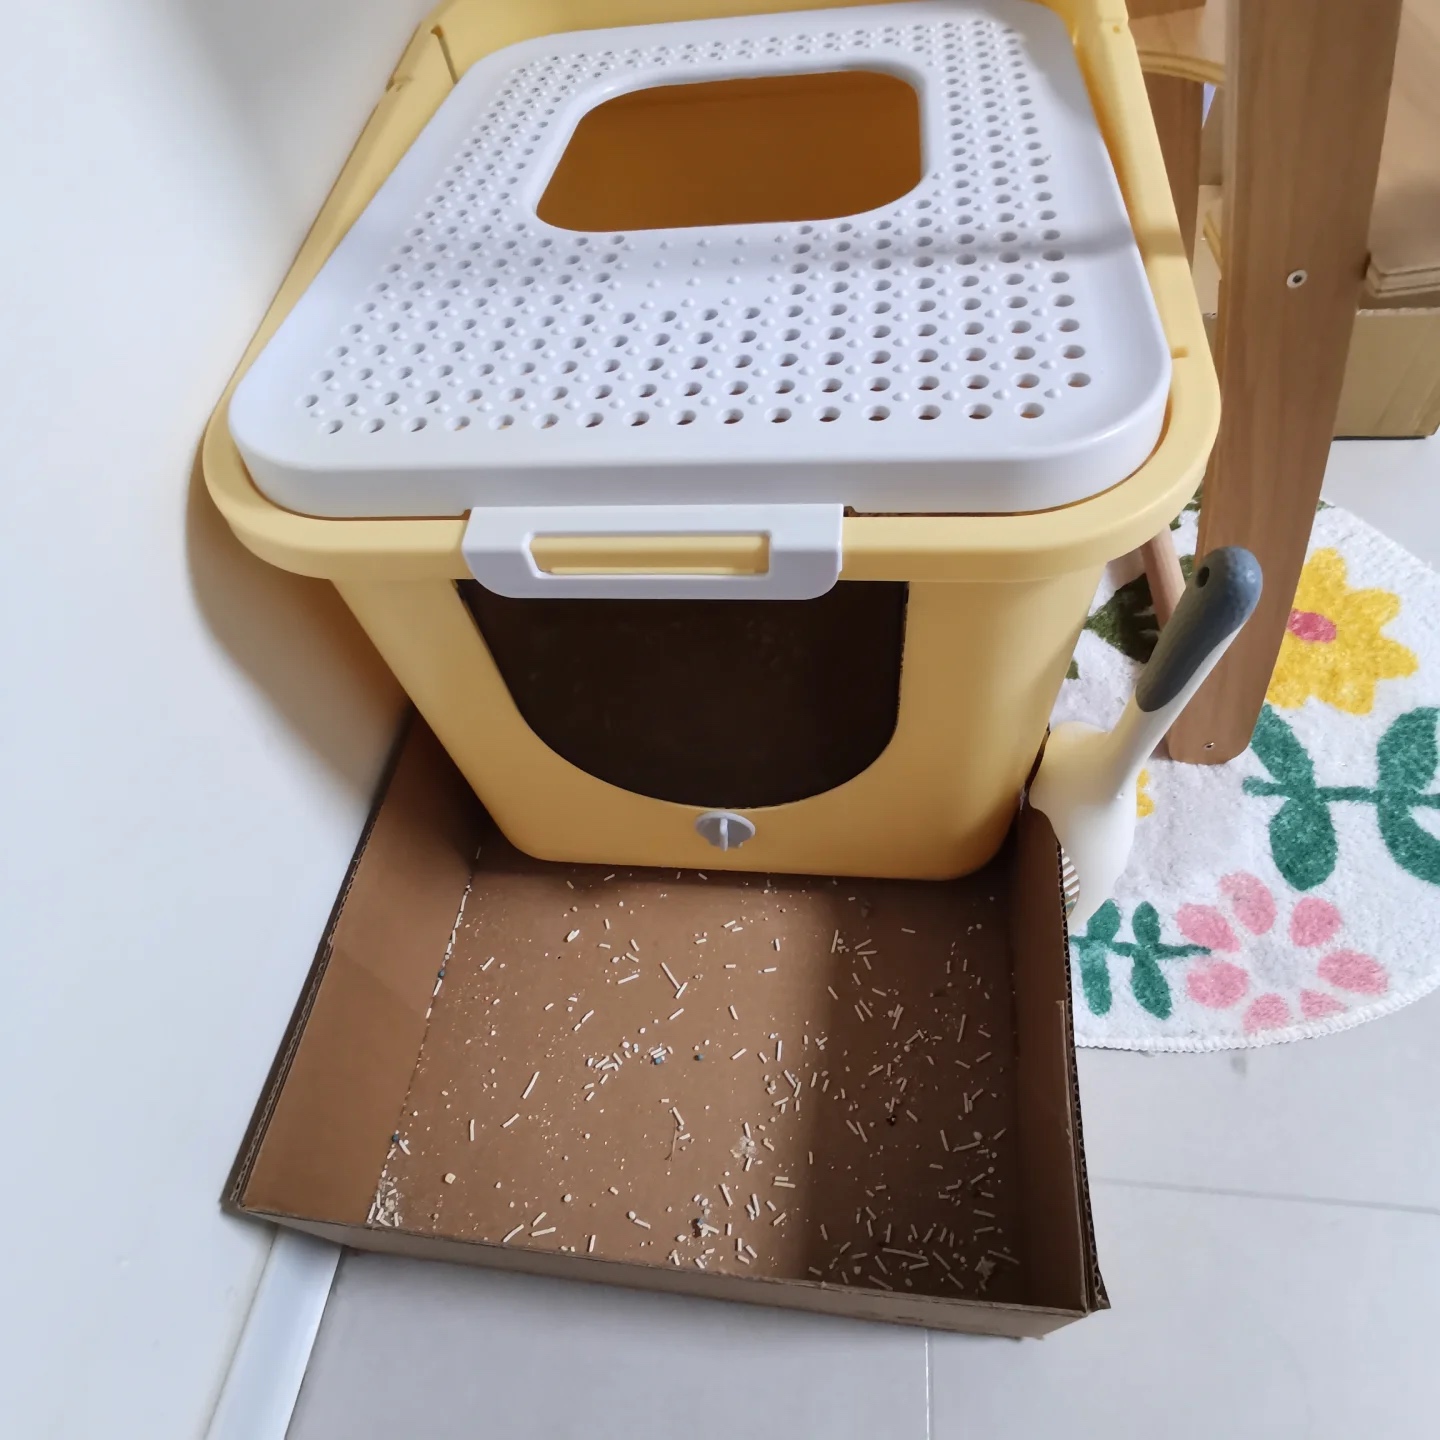
Use a box that remains rigid when lifted. Keep the entrance side low and leave enough clear floor that the cat can approach and turn comfortably. Smooth the cut edges and keep exposed tape or staples away from the walking surface.
Lift the empty catcher to practice its disposal route before putting it in service. If it folds and spills when carried, it will be frustrating even if it catches litter well. Position it so that you can remove it without moving a heavy toilet every time.
Cardboard is a dry catch surface. Replace it if it becomes damp, soiled, chewed, or too soft to hold its shape. For a recurring wet-cleaning need, choose a washable structure instead of layering more paper over the problem.
2. Assemble a lift-out drainage-tile surface
The owner borrowed a bathroom material. A renter bought interlocking pool-and-bathroom drainage tiles after finding enclosed litter furniture costly and complicated; three photos showed the same green box, the old mat, and the assembled yellow-tile surface. Fit a small, stable area first and lift it regularly to clear the grains below.
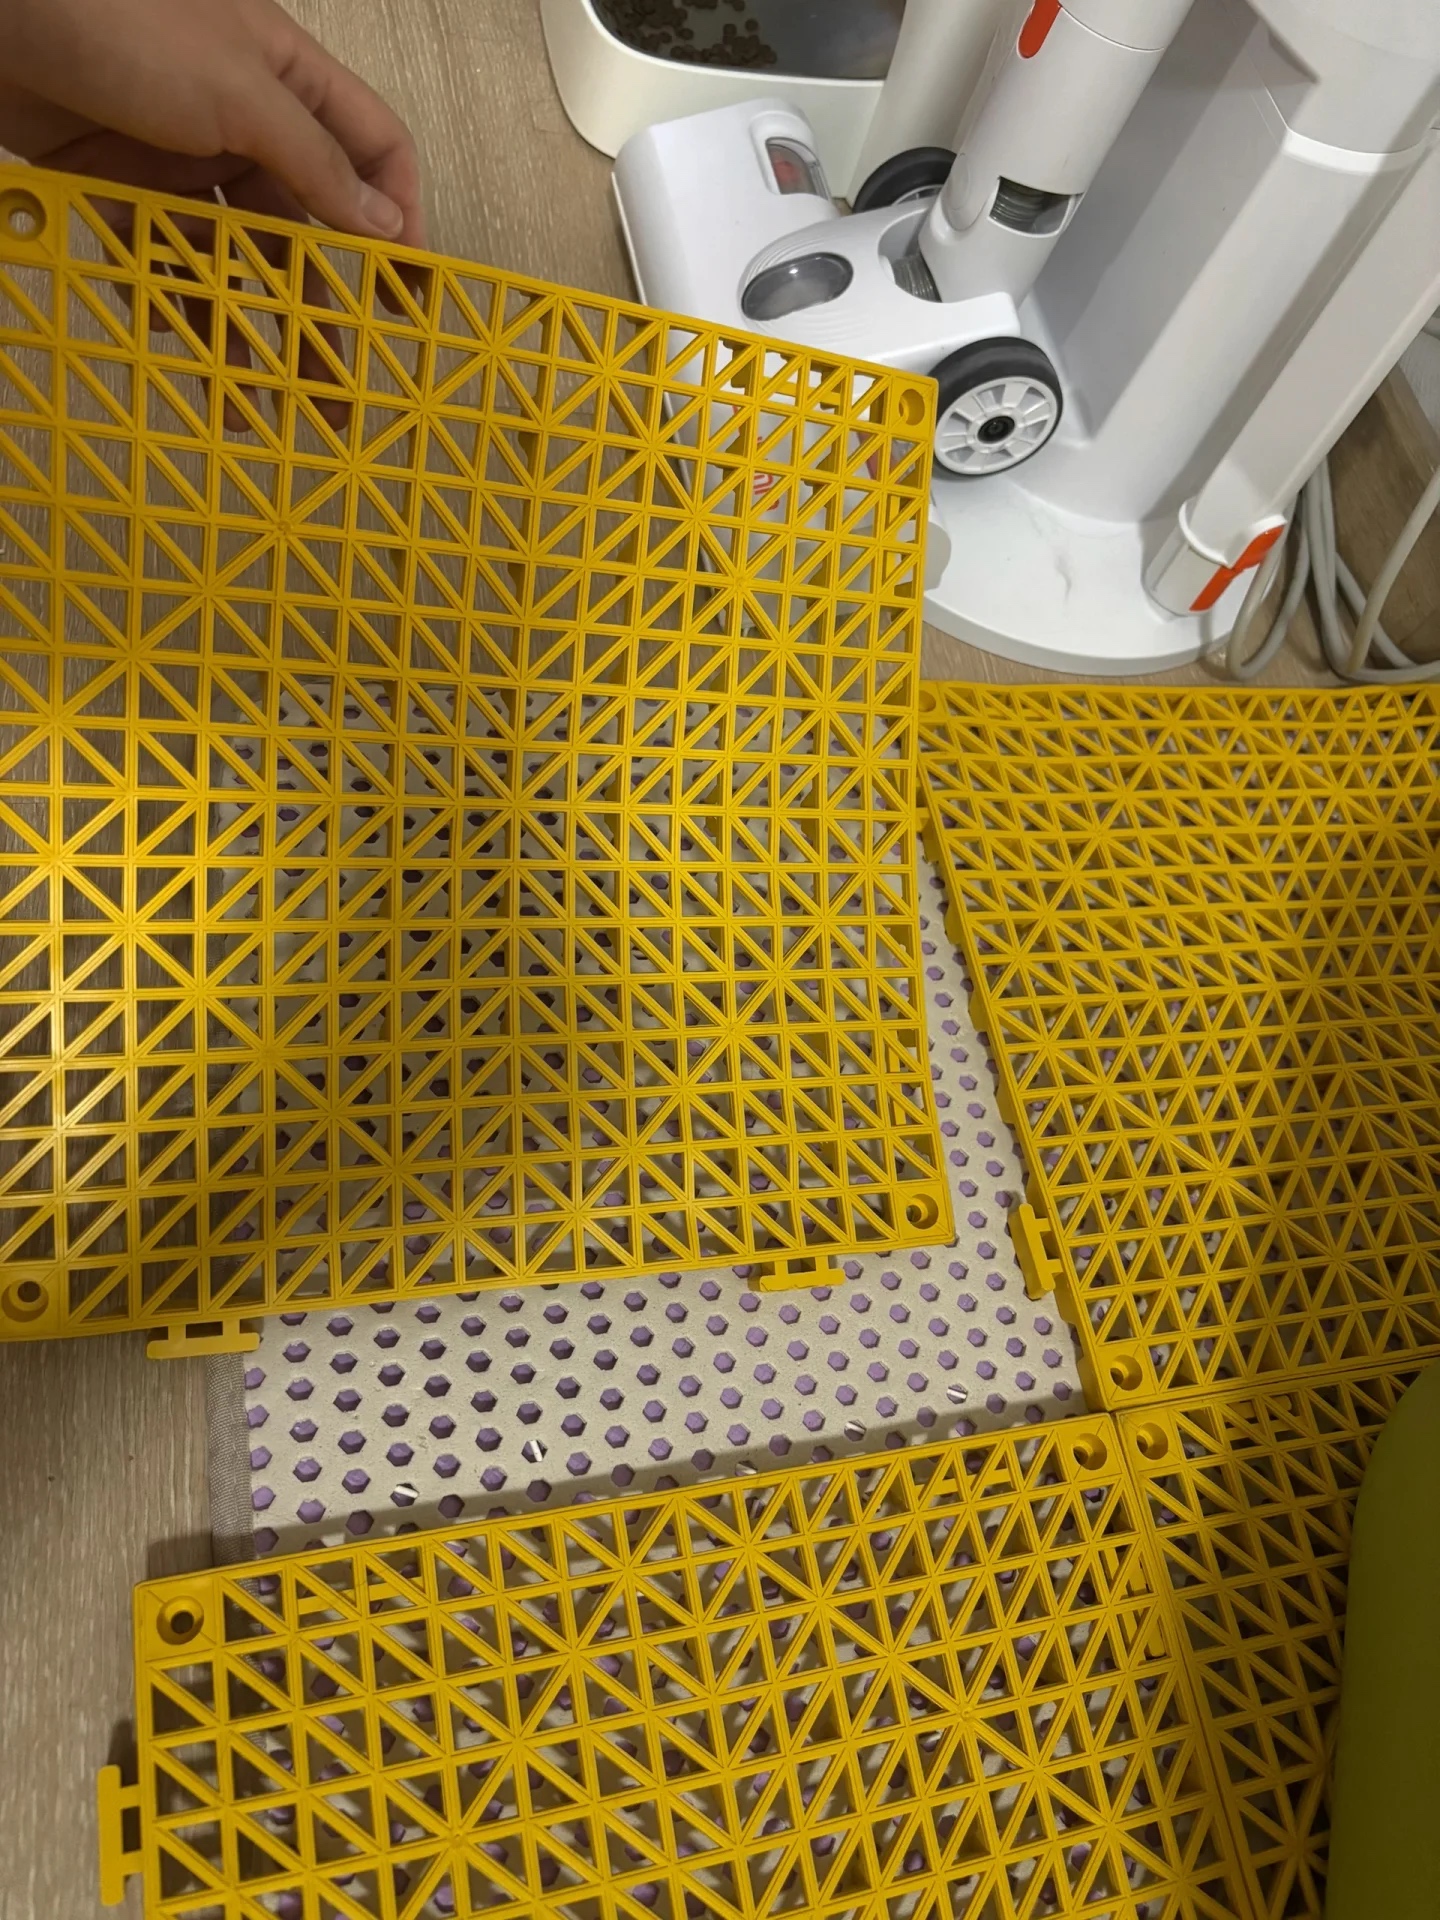
Choose a surface that lies flat, connects securely, and has no rough cut ends. Check the holes and edges from the cat’s walking height as well as from above. Watch the first approach: a cat stepping around the tiles is telling you that the surface is not serving its intended role.
Keep a smooth, washable catch surface underneath if grains otherwise fall through to the floor. Test the two pieces together for sliding. A removable top makes emptying easier, but the pieces should remain steady during an ordinary entry and exit.
For cleaning, separate the layers and use a method appropriate for their materials. Let washed components dry before reassembly. The important design feature is access to the trapped litter, not simply hiding it beneath a larger mat.
3. Put an existing mat in a low-entry catch tray
The setup went through three versions. One household tried a mat, then an enclosure, and finally added a custom acrylic tray containing the mat; after half a month, the owner photographed grains retained in the tray, including a week’s collection. Measure the actual exit area and choose a tray you can lift and empty frequently.
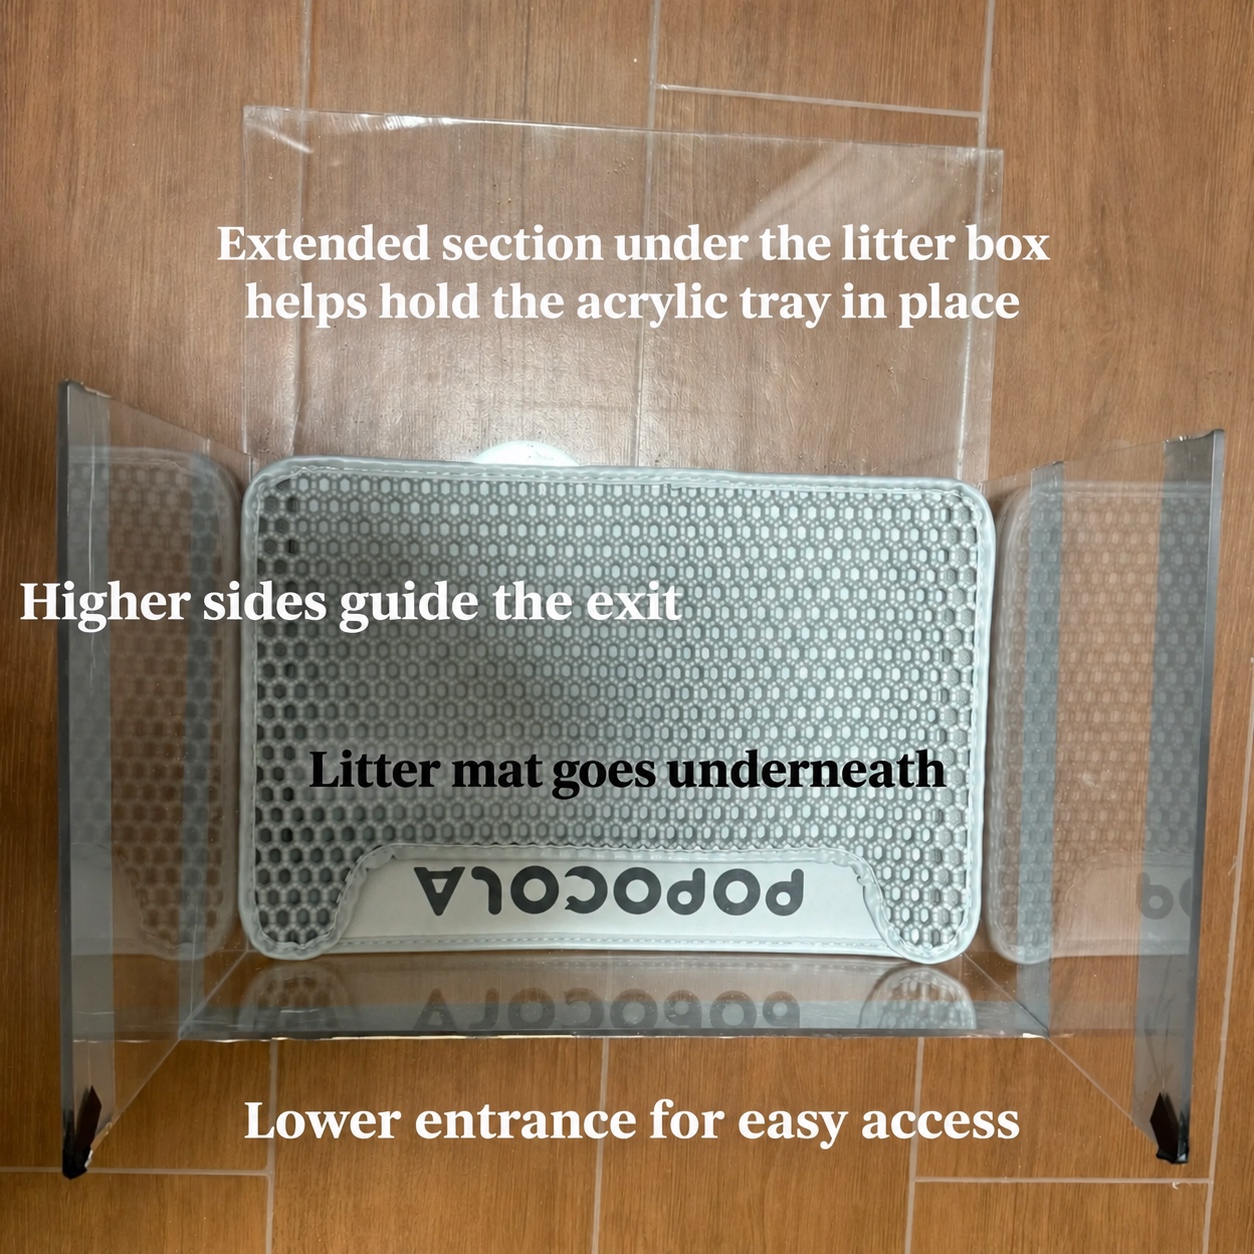
The useful part is a removable catch boundary around the mat. Keep the front low, the edges smooth, and the walking area stable. Ready-made household trays are worth checking before commissioning a custom piece; judge the actual shape rather than assuming that any tray will fit.
Make sure the cat can step into and out of its toilet without being forced through a narrow channel. Keep enough room for a turn and preserve an open escape route. If the tray makes the mat harder to shake out or leaves a wet inaccessible seam, simplify the layers.
Keep side panels from becoming a barrier
With two cats jumping out and scattering litter, another owner cut a large cardboard panel, added a cat-sized doorway, and wrapped the finished piece in holiday paper. The construction shows how quickly a side-control idea can become a room barrier. Check the route before adding any panel, especially where another animal could wait at its opening.
ASPCA litter-box guidance emphasizes quiet locations that are not cornered, with space to see an approaching animal and more than one way to leave. Keep those access needs ahead of litter containment. A flat catcher may be a better fit than a wall around the toilet.
Test chewing, stepping, and emptying
One owner photographed a large chewed opening in a newly purchased mat less than a month after buying it. Remove a mat that develops missing pieces or damaged edges and choose a different surface for that cat.
Check your DIY setup after ordinary visits. Look for loose grains on the floor beyond it, pieces that shifted, dampness underneath, and edges that have begun curling or being chewed. Empty the catcher while inspecting it rather than waiting for a deep layer to build up.
Change one feature at a time. If the cat jumps over the mat, try a different position or simpler surface rather than making the exit narrower. Keep the accepted toilet usable throughout the trial.
FAQ
What can you use as a DIY cat litter mat?
Try a shallow dry cardboard catcher, smooth interlocking drainage tiles over a catch surface, or an existing mat inside a suitable low-entry tray. Choose by stability, access, chewing behavior, and how easily you can empty it.
How do you make a DIY litter mat work better?
Place it where grains actually fall, keep it flat, and clear what collects underneath. Watch the cat’s ordinary route and simplify the arrangement if it starts avoiding the surface.
Is a bigger litter mat always better?
A larger mat only helps if the cat walks across it comfortably and you can keep it clean. Start with the observed spill area rather than covering a route that the cat then jumps over.